How to Add a CMS to a Lovable App
Keep your blog out of your code, and let Lovable's agent draft posts you approve. What belongs in Supabase, what belongs in a CMS, and a step-by-step setup with Garchi CMS.
 Aditya Kadam
Garchi CMS
Aditya Kadam
Garchi CMS
Your Lovable app is live. It looks good, signups work, and someone asks when the blog is coming.
So you prompt Lovable: "Add a blog with our first post." It builds a page, drops your article into a component as a block of text, and redeploys. Fine. Then you want a second post. Then you spot a typo in the first one. Then your co-founder wants to write something and doesn't have access to the Lovable project.
Three posts in, you're paying for one of the best app builders around and using it as a text editor. Every sentence you publish goes through a code change.
The fix is to move content out of your code. This guide shows you what to move, where to put it, and how to set things up so your app renders the posts while Lovable's agent drafts new ones for you to approve. The example is a blog, because that's usually the first thing people need. The same setup works for FAQs, testimonials and landing page copy.
Do you even need a CMS?
If your app has one page of marketing copy that changes twice a year, you don't. Ask Lovable when it changes and move on.
You need one when content changes more often than code, or when someone other than the builder wants to edit it. A blog meets both conditions on day one.
What goes in Supabase and what goes in a CMS
Most Lovable apps run on Supabase, so your first instinct is to add a posts table. I get it. The database is right there.
Split your data by who edits it:
| Supabase | CMS |
|---|---|
| Users and accounts | Blog posts |
| Subscriptions and payments | FAQs |
| Orders, bookings, anything your app acts on | Page copy and testimonials |
| Data with logic or permissions attached | SEO titles and descriptions |
A quick test: if the person editing it isn't the person building the app, it belongs in a CMS.
A posts table holds up for the first few posts. Then you want drafts. Then a proper editor instead of a textarea, an SEO title for each post, cover images, a second author, and a way to preview before anything goes live. Each of those means another prompt, another migration and another thing to maintain. Six months later you own a small, fragile CMS you never planned to build.
Your three options
Build it in Supabase. This works for a handful of posts written by one person. The cost climbs with every feature on the list above.
Run WordPress or Ghost alongside your app. You get a mature editor and solid SEO. You also get a second site on a subdomain, with its own theme to keep in line with your app's design and its own hosting and updates. It makes sense if your blog is a separate publication.
Use a headless CMS. You write in the CMS, and your app fetches the content through an API and renders it with your own components. The blog looks like the rest of your app because it is the rest of your app. The cost is wiring up the fetching once.
For most Lovable apps, the third option wins. The rest of this guide sets it up with Garchi CMS. (Disclosure: we build it.)
The part most guides skip: Lovable can write to your CMS too
A standard headless setup runs one way. The CMS feeds the API, and the API feeds your app. That fixes editing for humans. Lovable itself, though, still only knows how to change content by changing code.
Garchi connects to Lovable twice:
Your app       →  Garchi API (API key)  →  published posts
Lovable agent  →  Garchi MCP (OAuth)    →  draft posts  →  you approve
Your app reads published content through the API. Lovable's agent works with your content through Garchi's MCP server. MCP is an open standard that lets AI tools connect to other software through a defined set of actions. (Here's a plain-English explanation if you want one.)
In practice, when you ask Lovable to "write a post about our new export feature", it creates a draft in Garchi. Your code stays untouched, and the agent can't publish. Everything it writes lands as a draft, and a person on your team decides when it goes live.
This matters more than it sounds. An agent with access to your codebase can change anything in it. An agent with Garchi's MCP tools can create and edit content, and nothing else.
Walkthrough: add a blog to a Lovable app
You'll need an existing Lovable app with a backend, either Lovable Cloud or your own Supabase project. Budget about 20 minutes.
1. Create a space and a Blog category
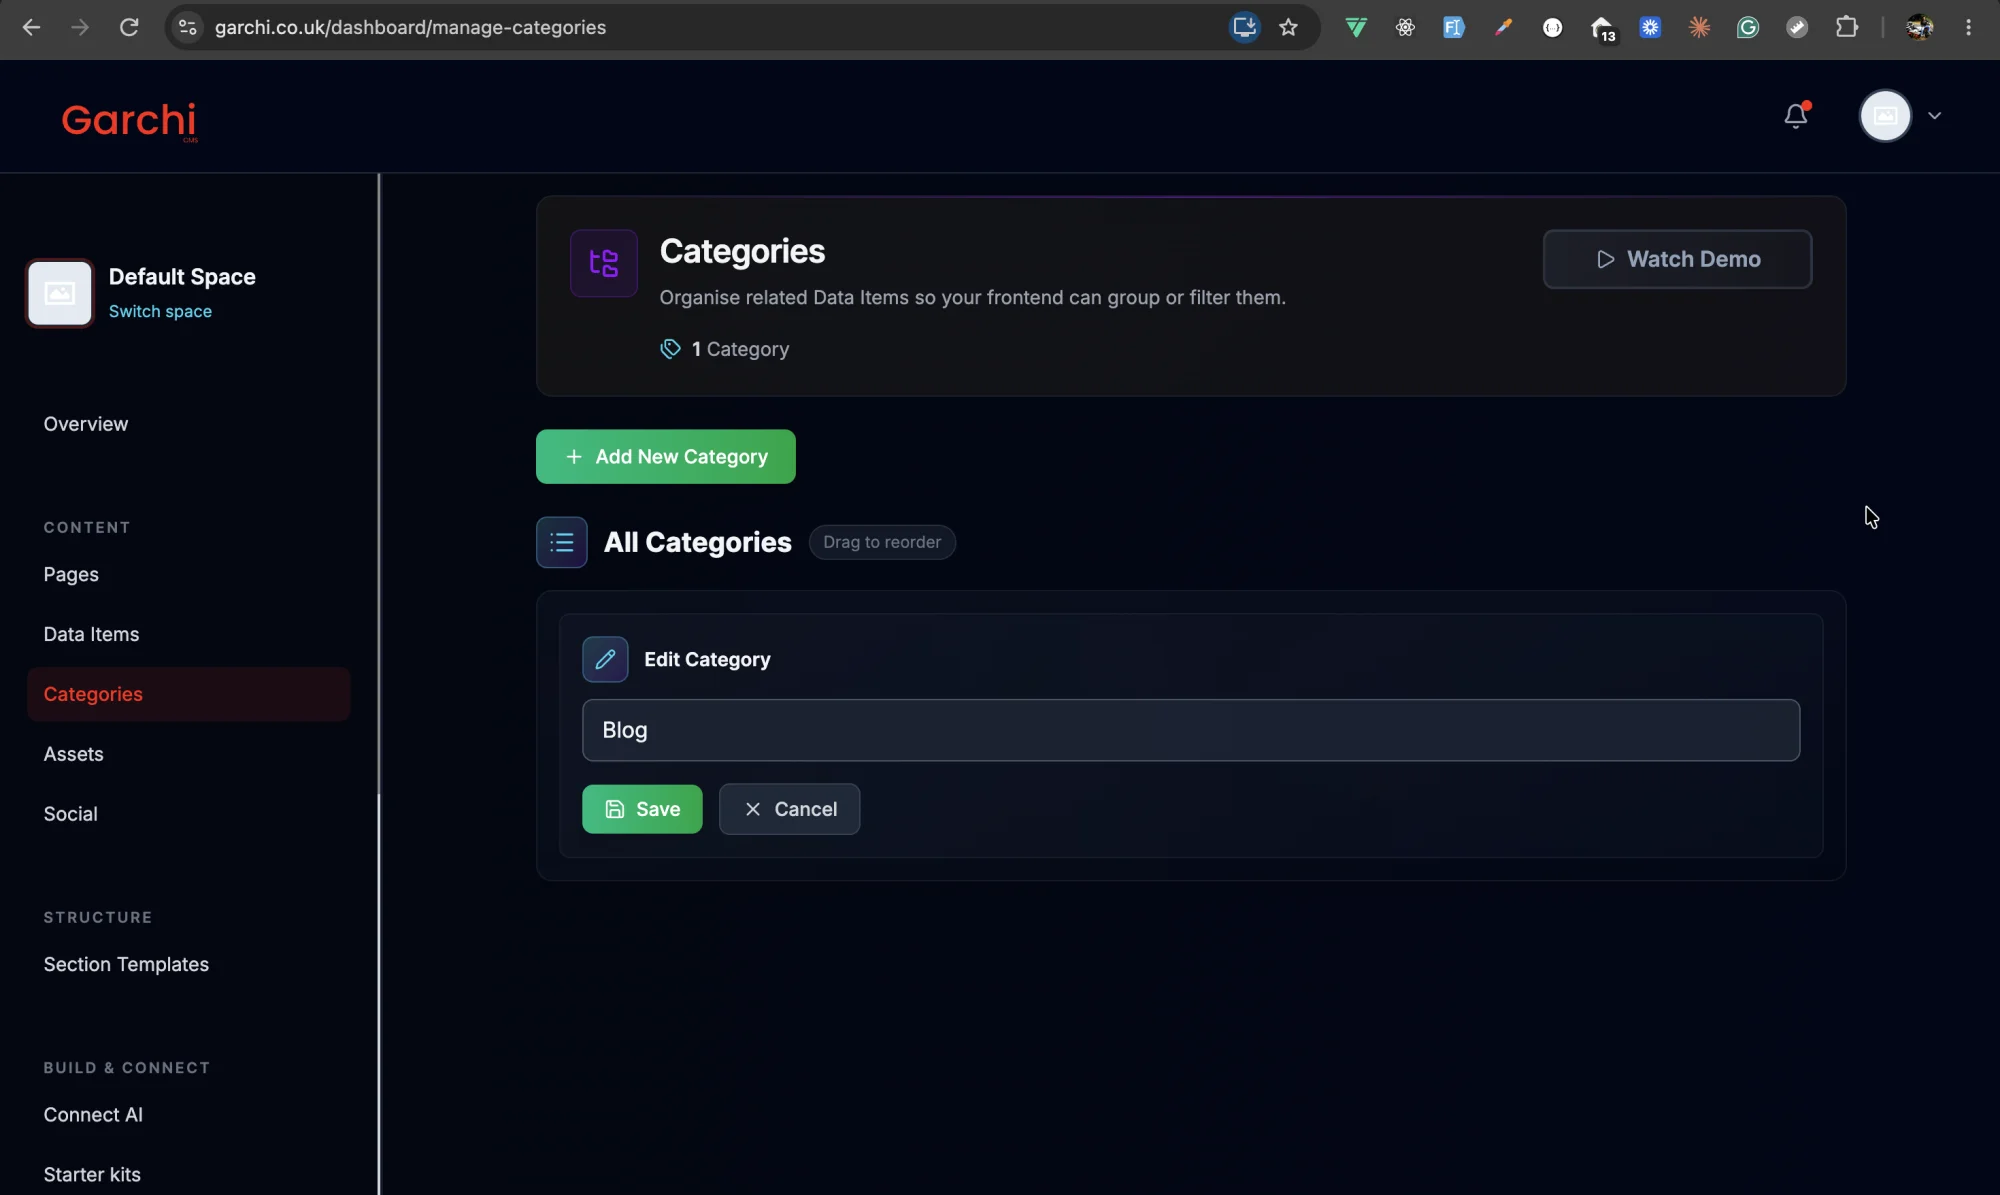
Sign up for Garchi and choose your space. Add a category called Blog. Every post you write becomes a data item in this category. You can also add multiple categories and associate them to your data item.
2. Connect Garchi's MCP server to Lovable
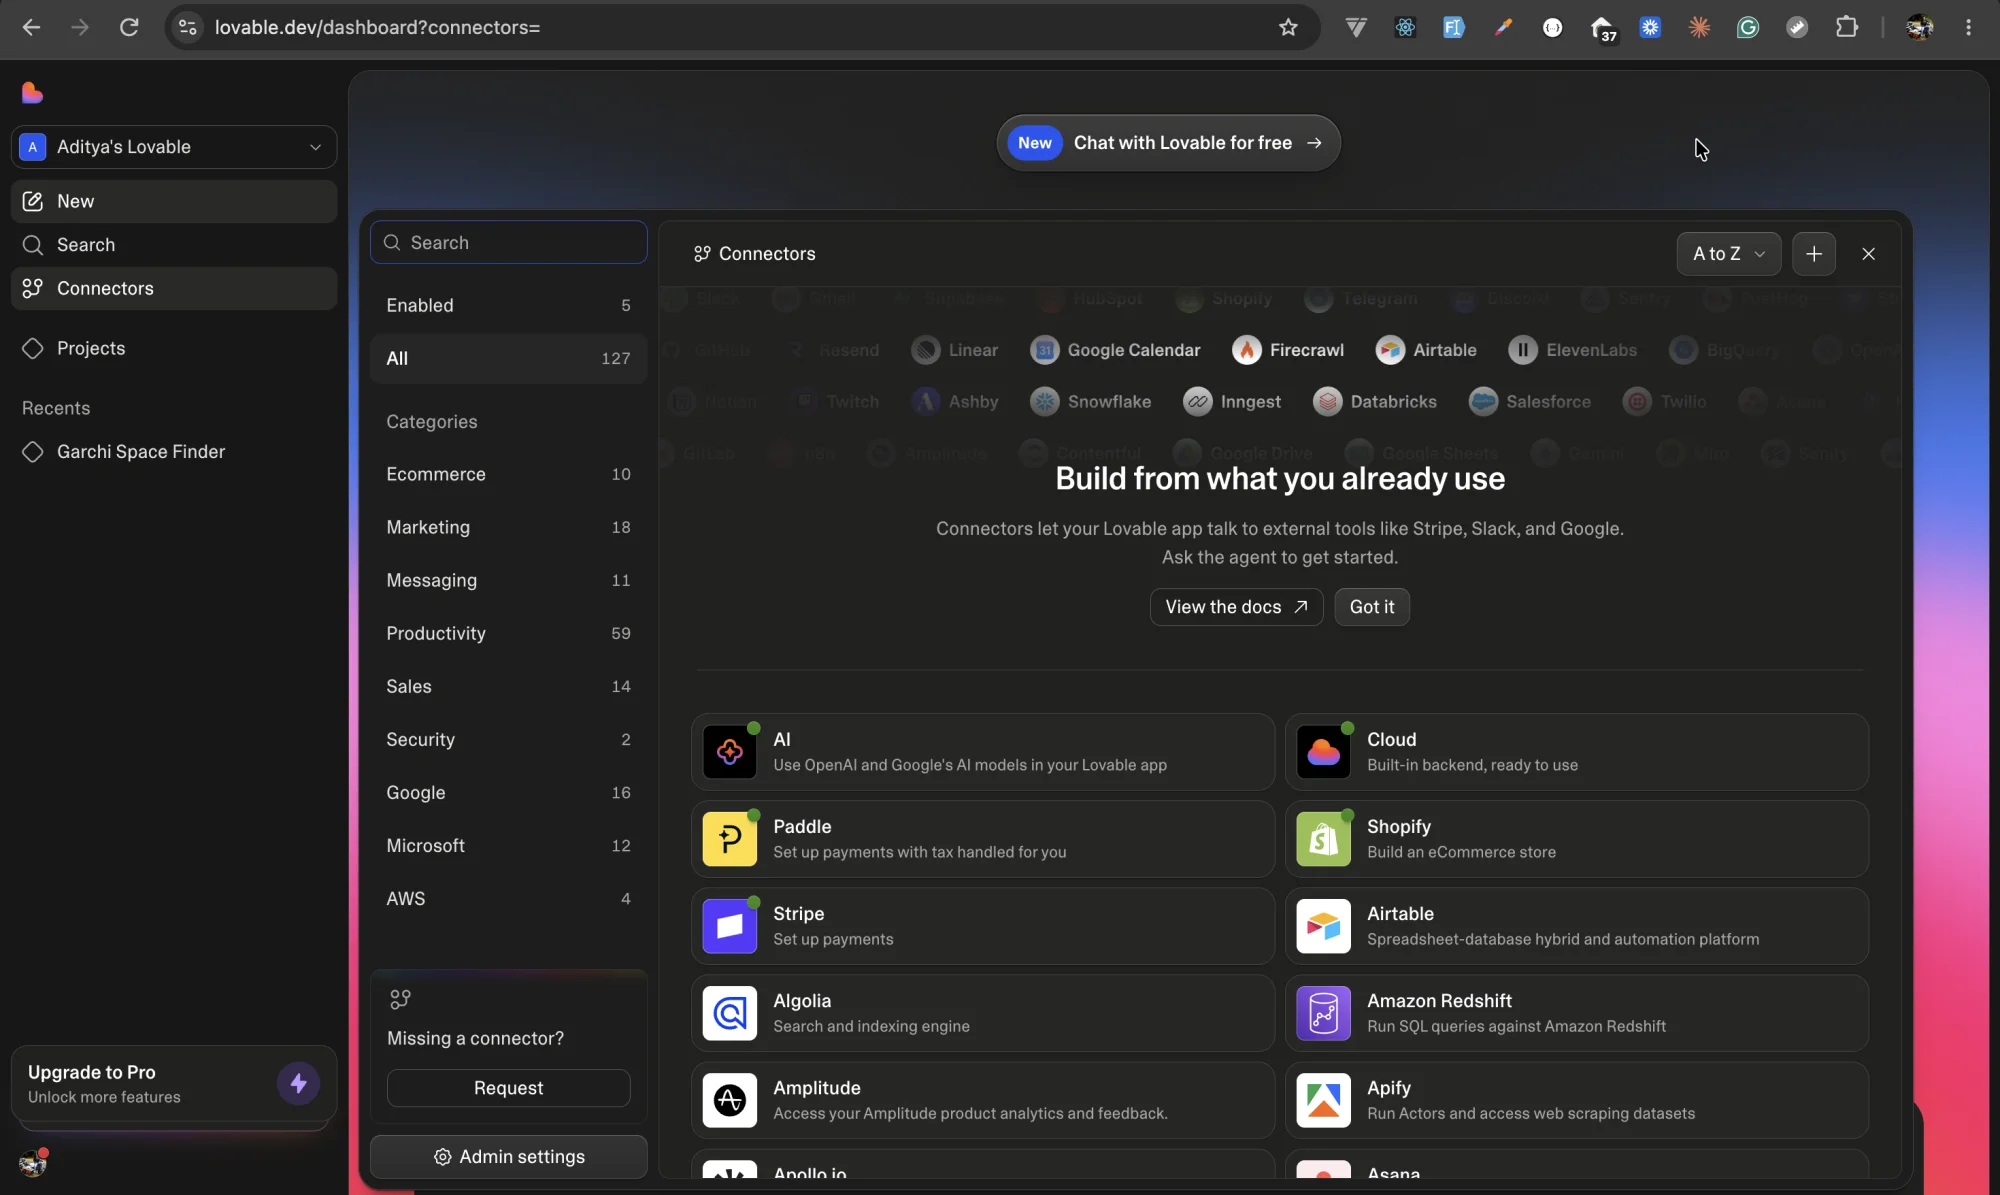
Go to your Lovable dashboard and click Connectors. Then on the screen click on plus icon and select MCP server.
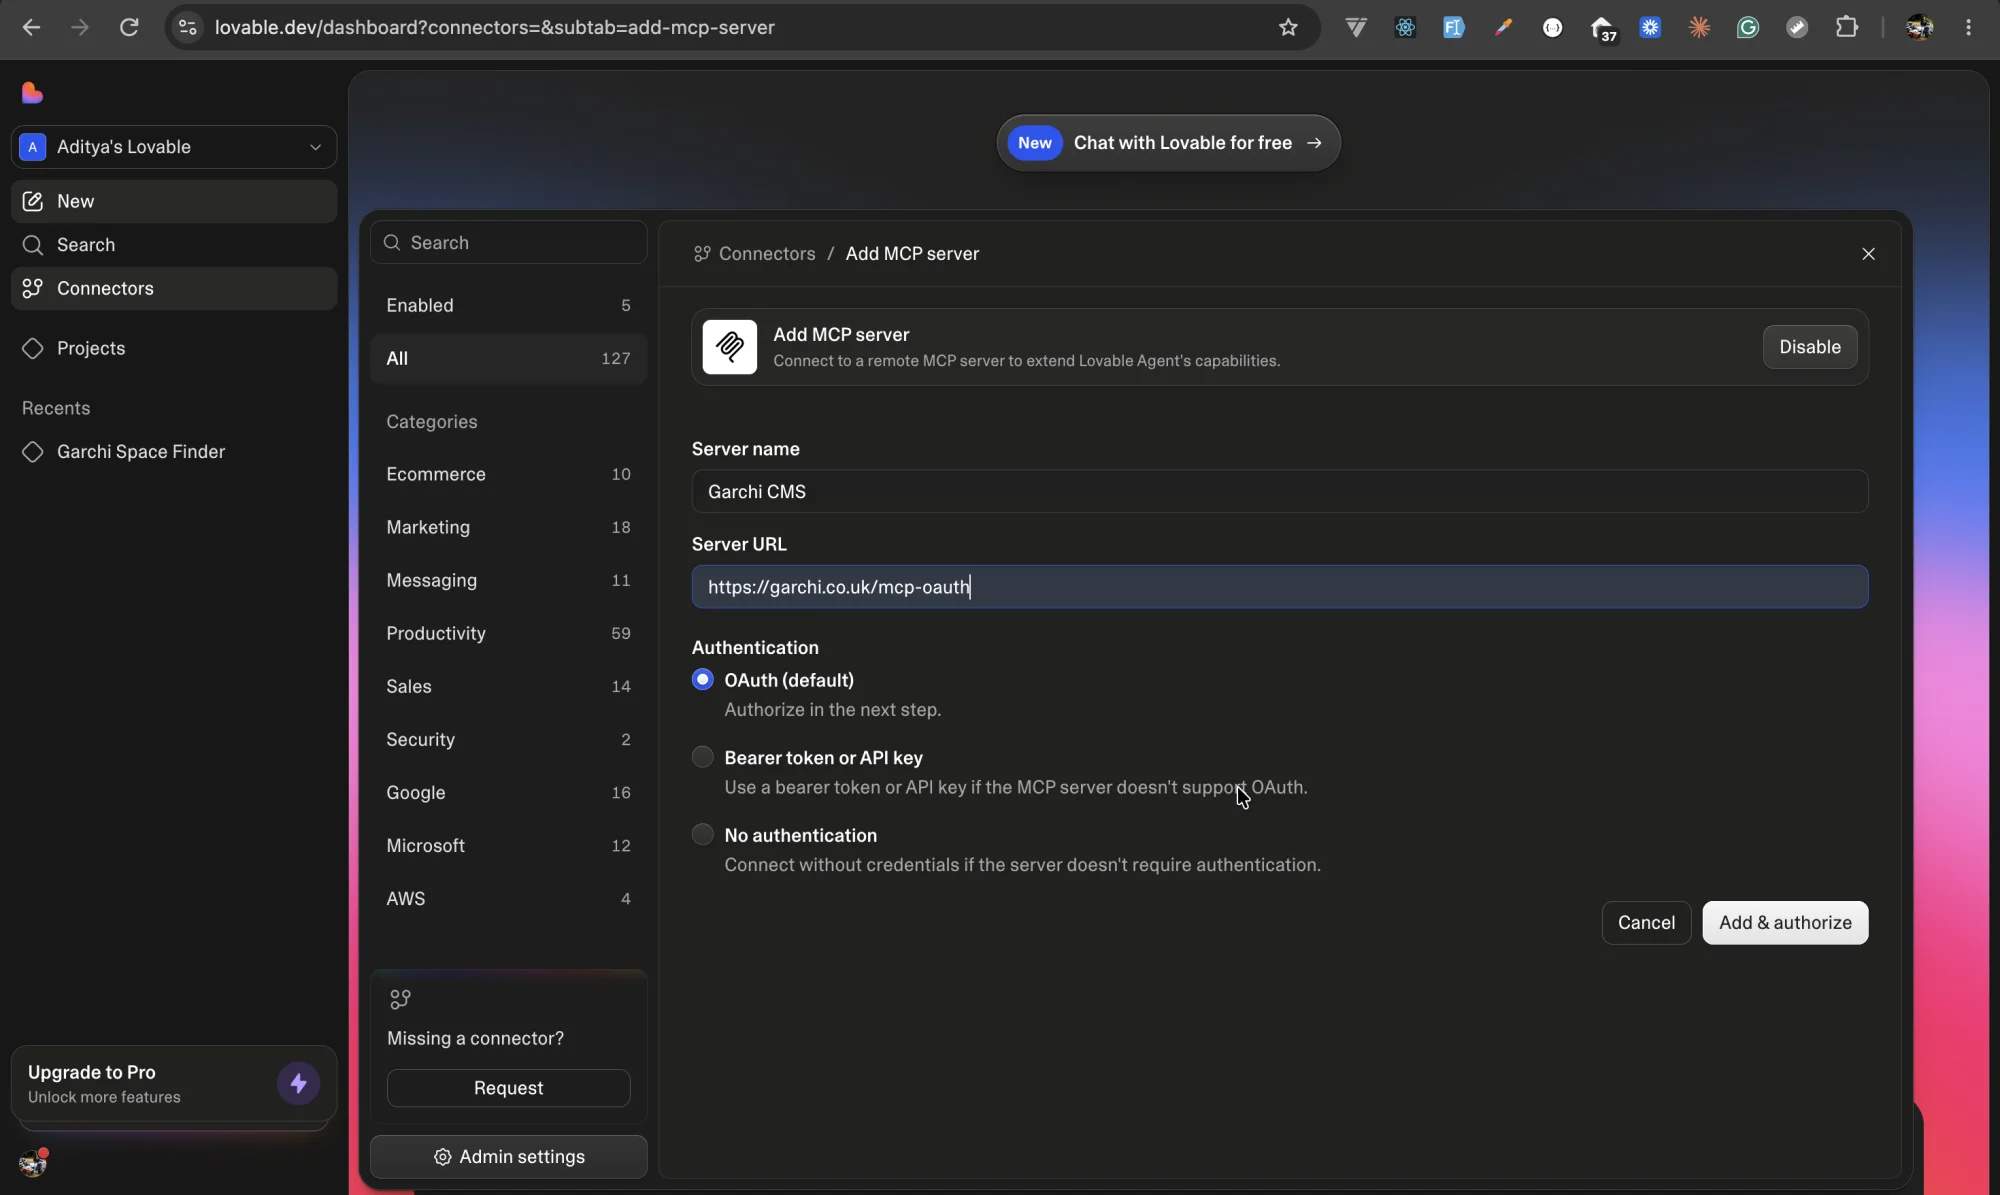
Add the details as below
Server Name: Garchi CMS
Server URL: https://garchi.co.uk/mcp-oauth
Authentication: Select OAuth (default)
Click on Add & authorize button. It will take you to Garchi CMS for sign in and authorize Lovable to use Garchi CMS MCP.
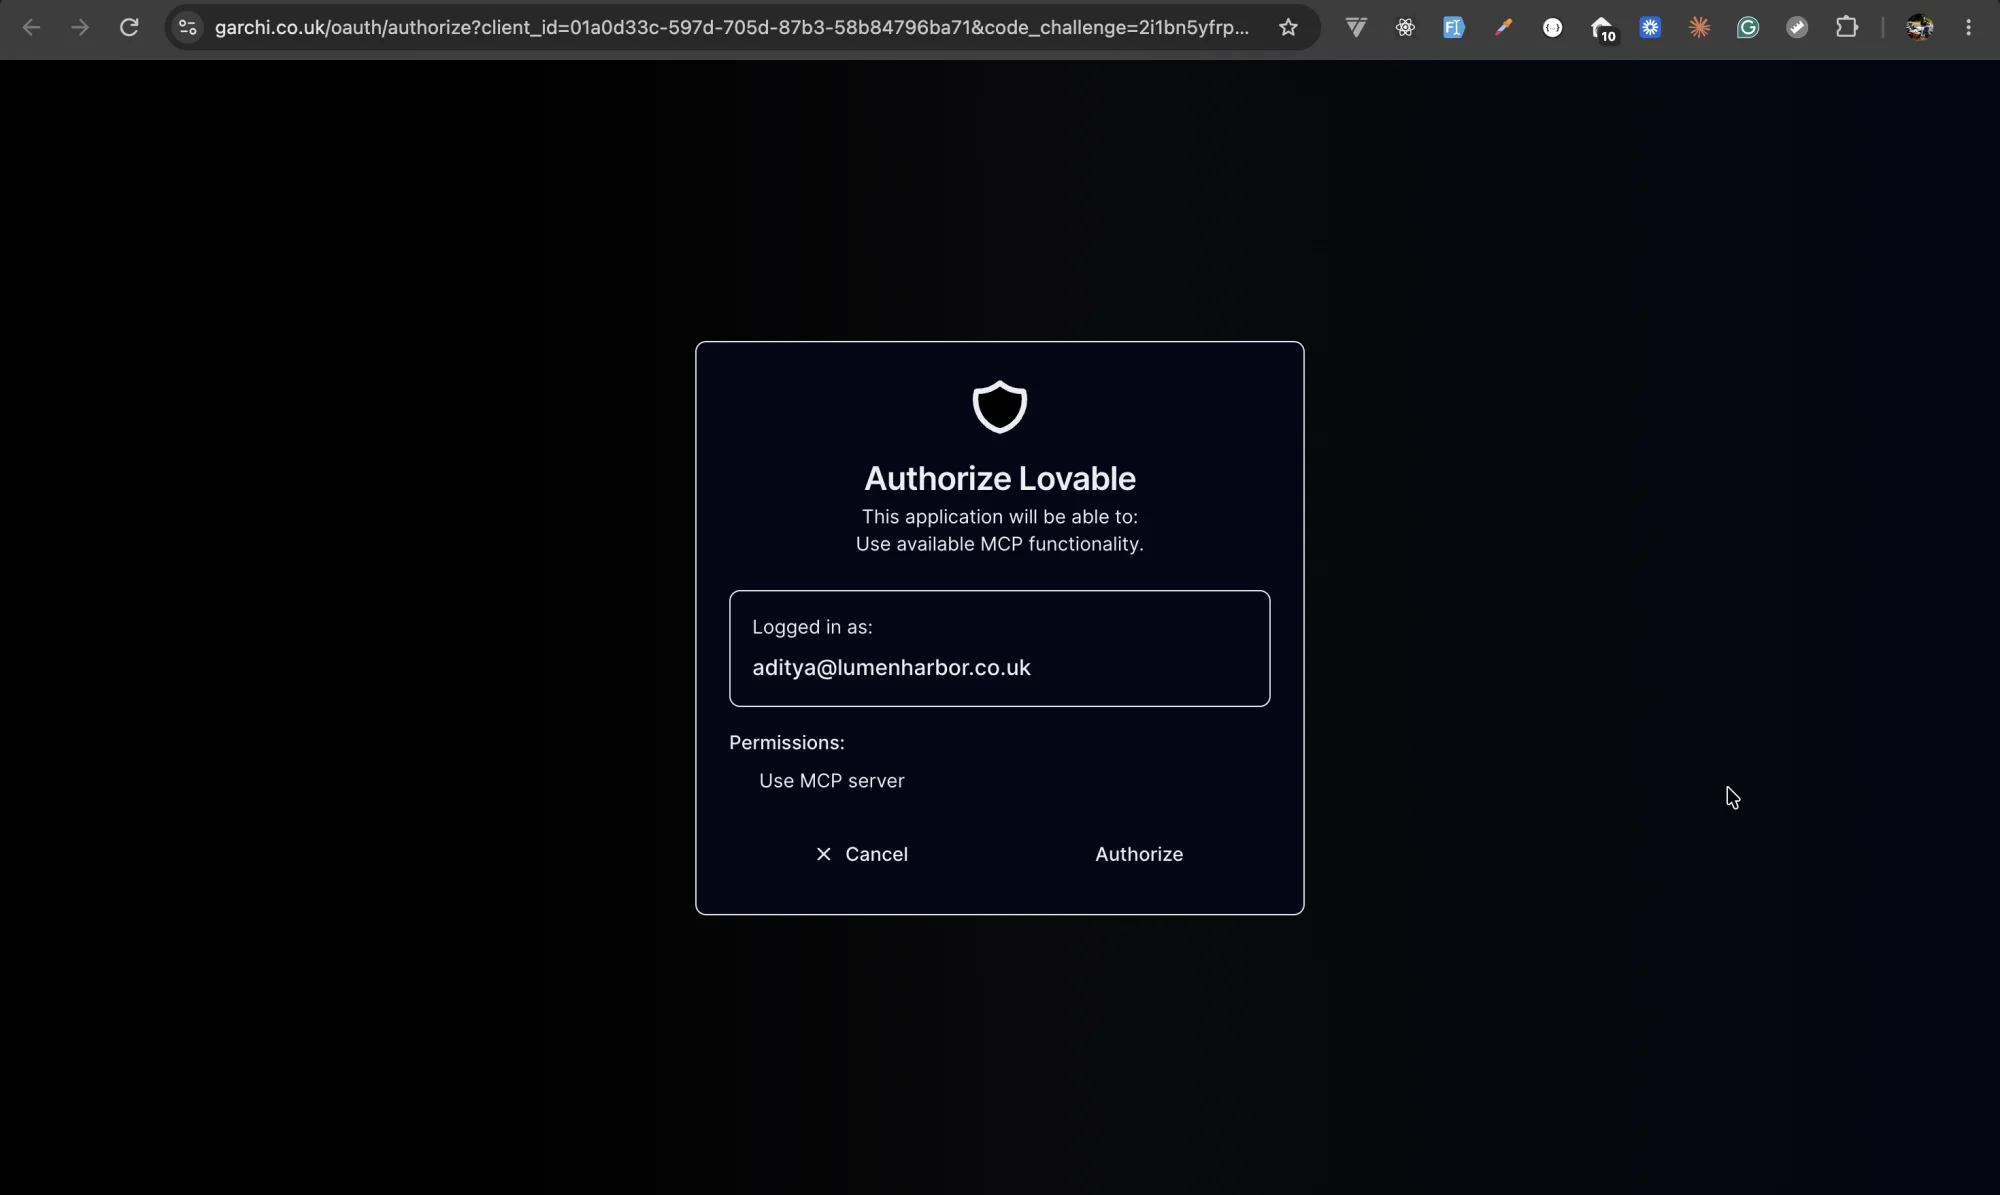
To check it worked, ask Lovable:
List the categories in my space on Garchi CMS.
If it comes back with Blog or with the list of categories in your Default space, you're connected.
Good to know
Sometimes Lovable may ask you to provide API key for creating content on Garchi CMS or do some read only operations. In that case specifically tell lovable to use Garchi MCP for content management while API key is only needed to call Garchi CMS API for content rendering in your project code.
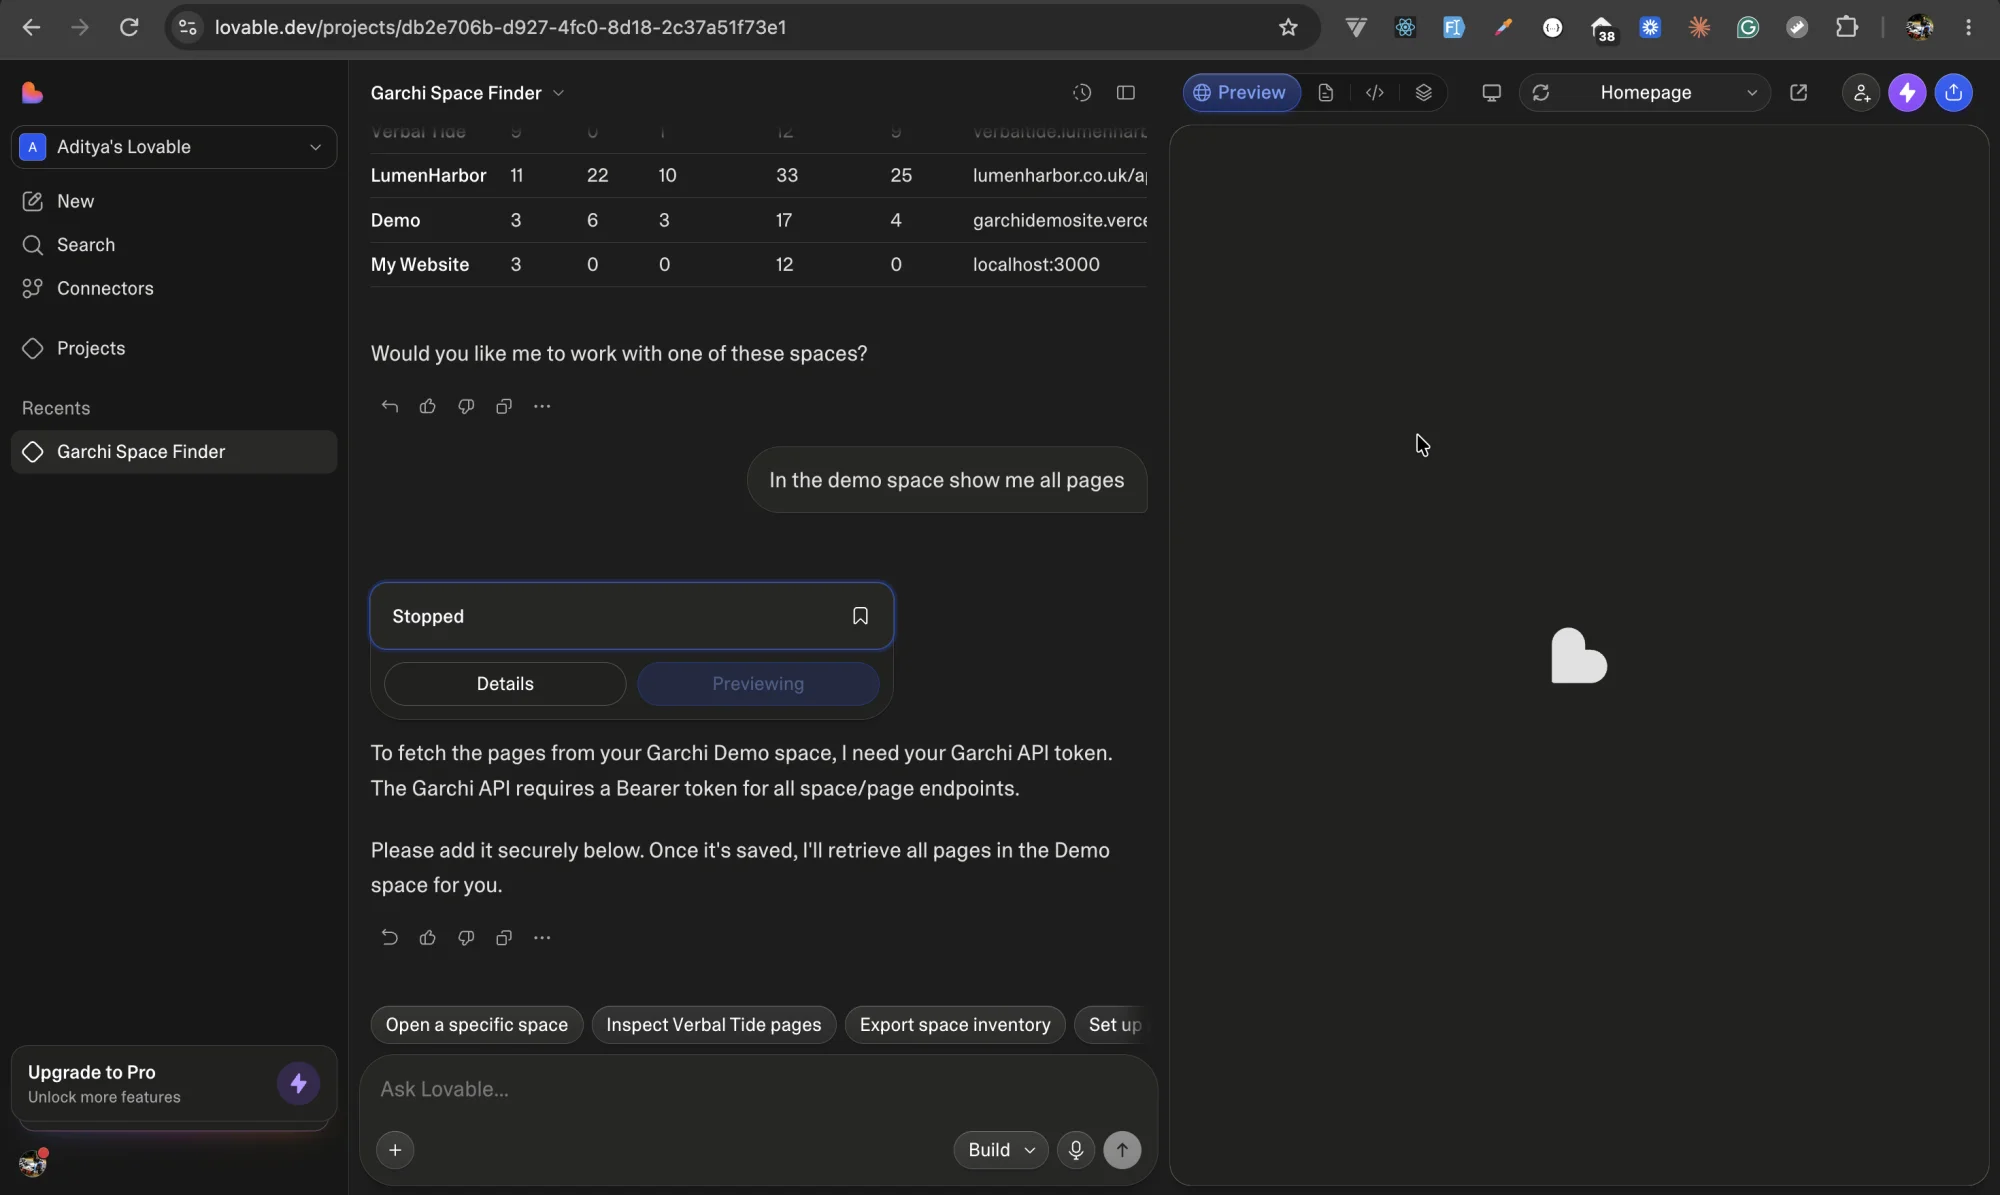
3. Create an API key and store it as a secret
Rendering uses a different credential. Your app authenticates to Garchi's API with an API key, sent as a bearer token.
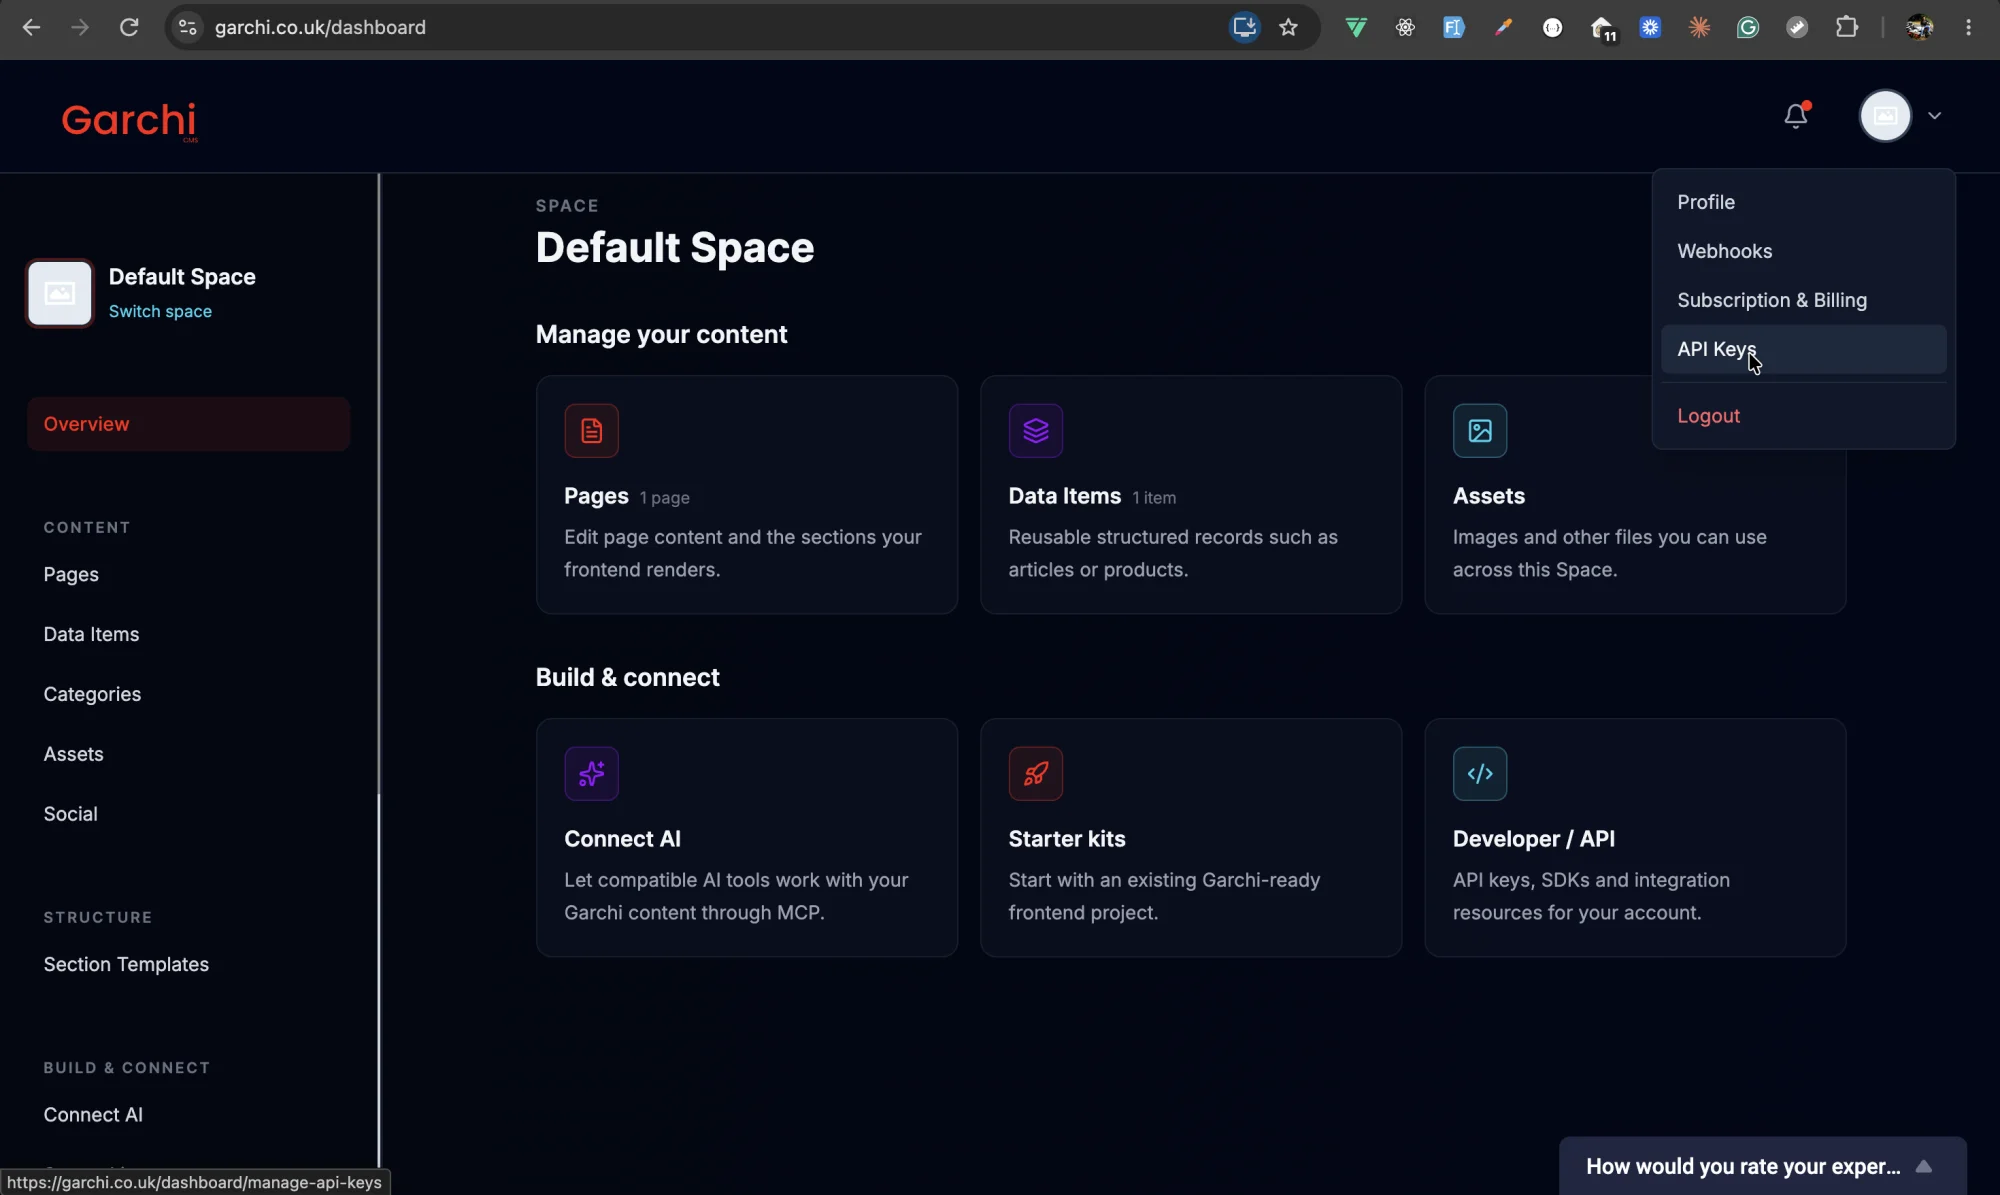
In the Garchi dashboard, click your profile icon in the top right, select API keys and generate a new key.
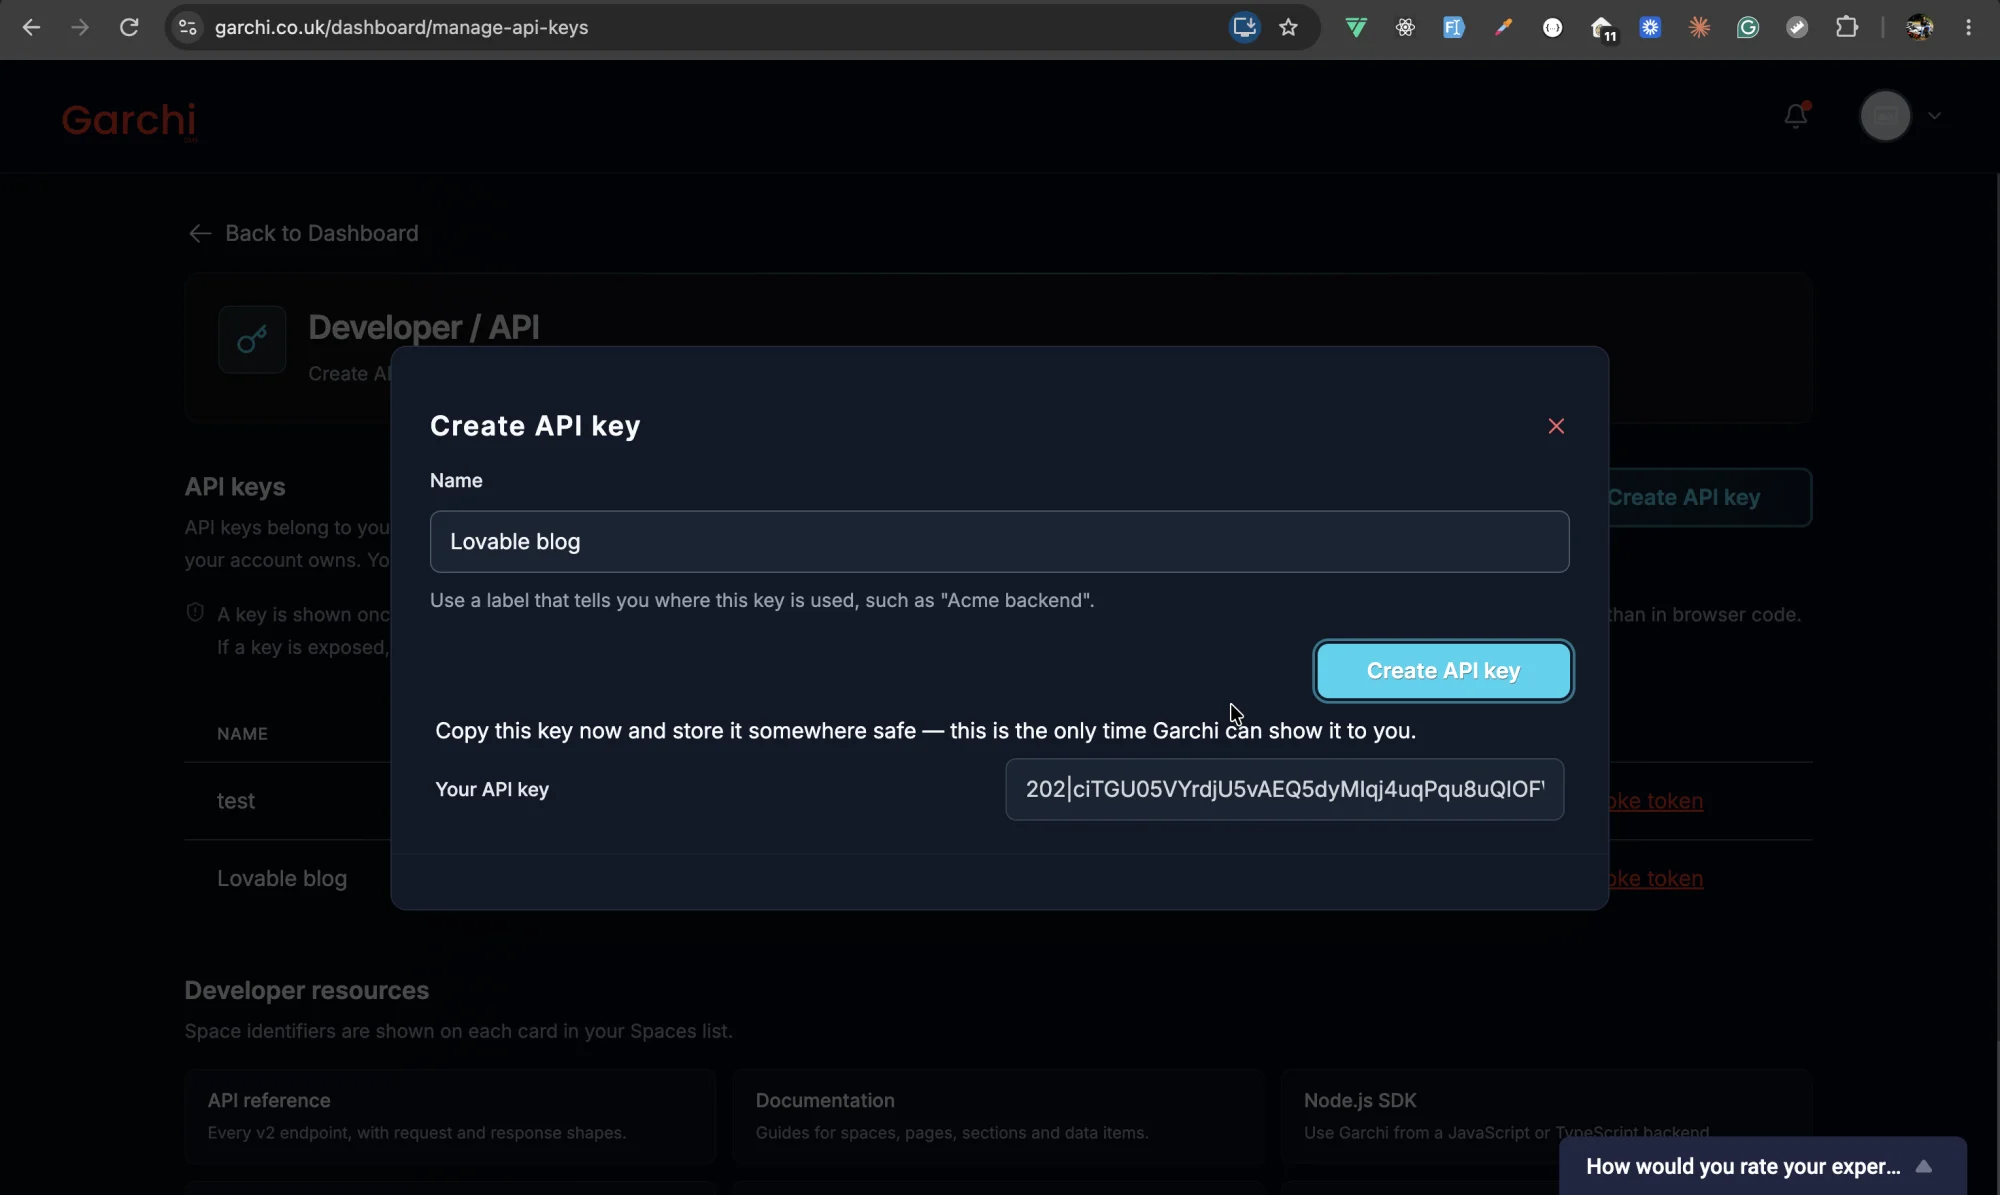
Keep that key on the server. Garchi's API is server-side only, so the key must never ship in your frontend code, where anyone could read it. In a Lovable app, that means a Supabase Edge Function. You store the key as a secret, the function calls Garchi, and your frontend calls the function.
For additional security, specifically tell Lovable Chat to store the API key as a server-only secret in Cloud Secret
You might wonder why there are two credentials. They do different jobs. OAuth lets the agent act on your behalf to draft and edit content. The API key lets your app read what you've published.
4. Ask Lovable to build the blog
Garchi has official SDKs for Node and PHP. Lovable's Edge Functions run TypeScript, so use the Node SDK. Paste something like this:
Build a blog using Garchi CMS. Create a Supabase Edge Function that reads the GARCHI_API_KEY secret and fetches data items from the Blog category in my Garchi space, using the @garchicms/garchi-node-sdk package. Add a /blog page listing posts with title, summary, cover image and date, and a /blog/:slug page for single posts. Sanitise post HTML before rendering it. Don't hardcode any post content.
In case if the Node SDK doesn't work ask Lovable to fall back to Garchi's REST API. The API docs can be found here
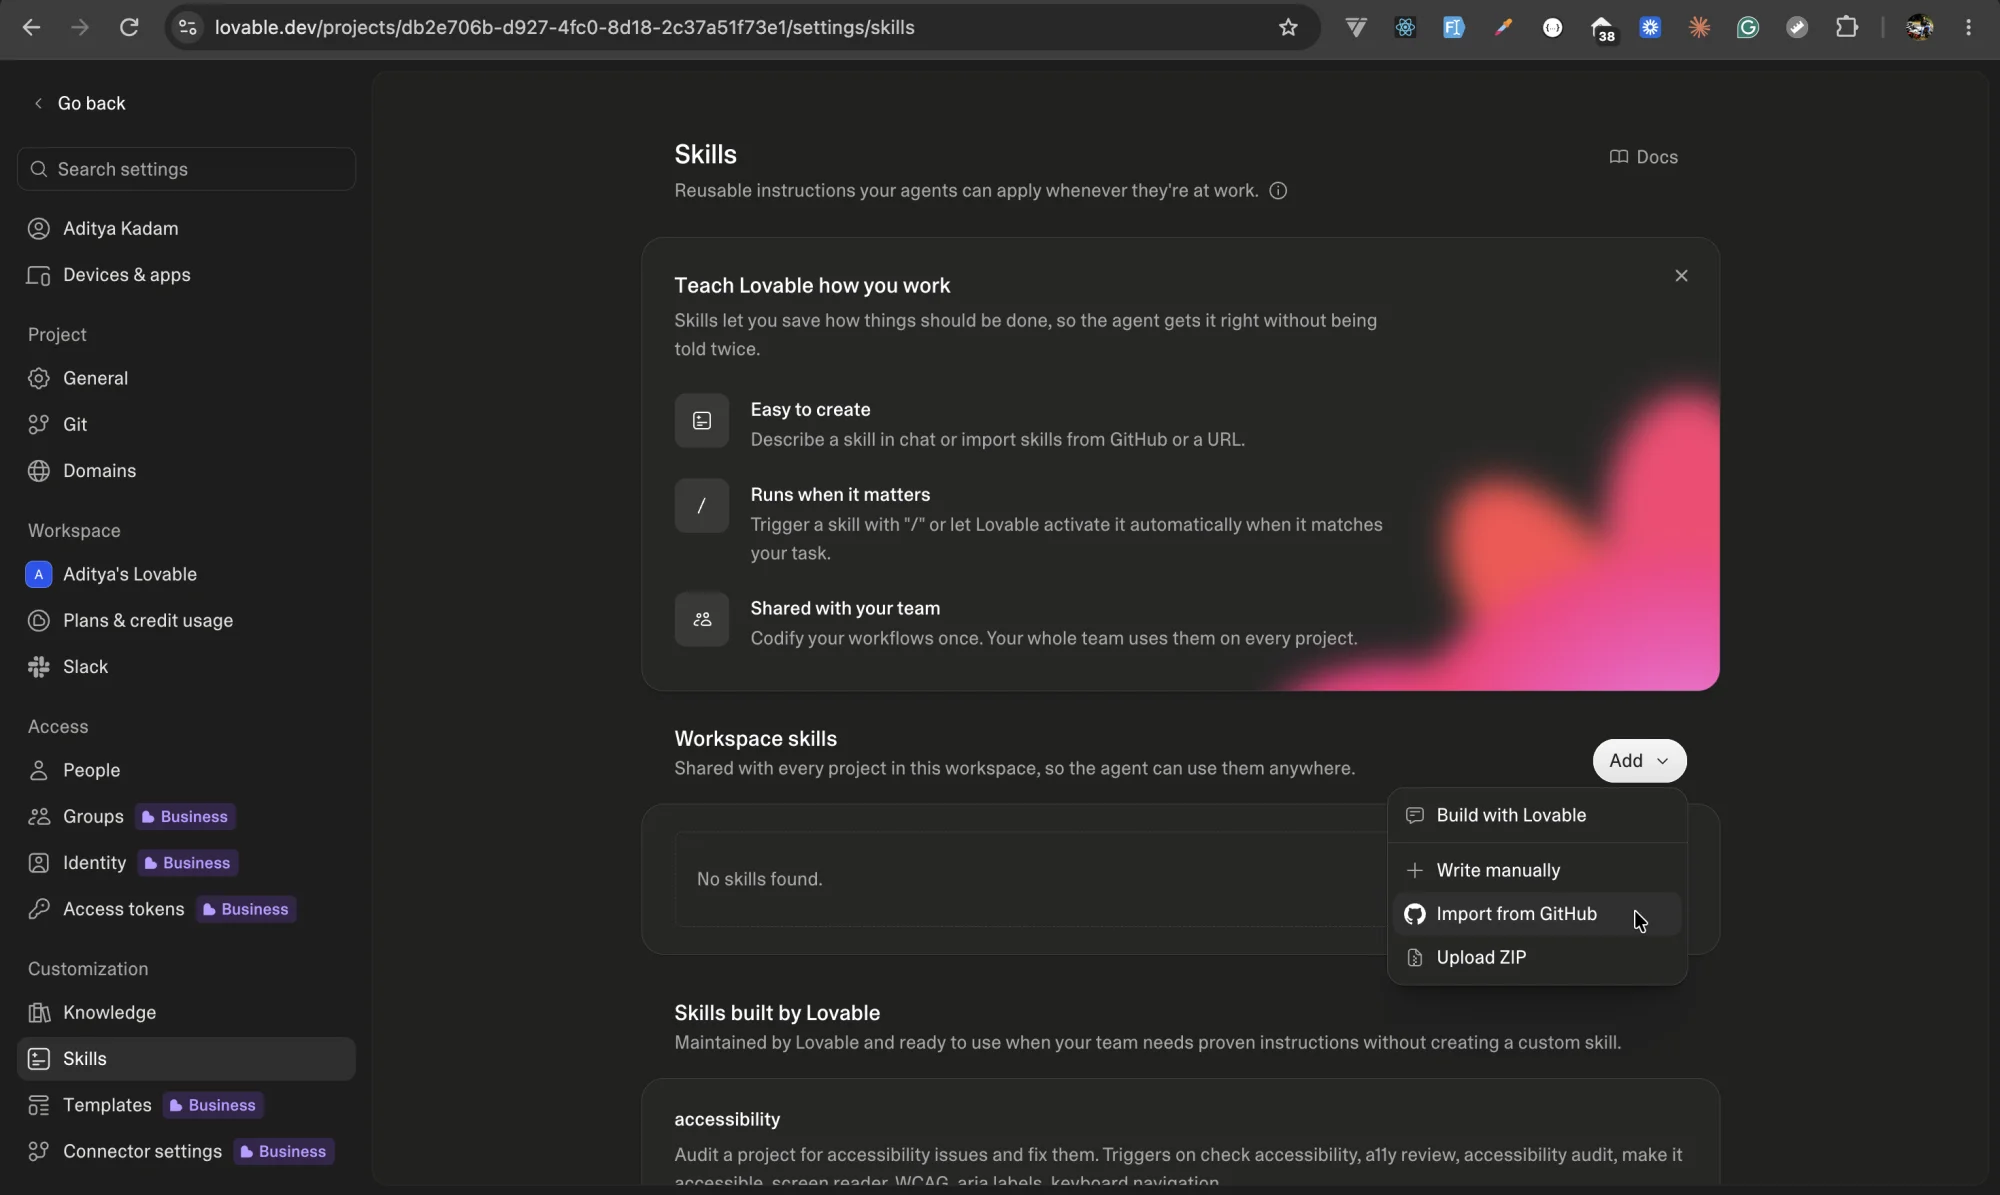
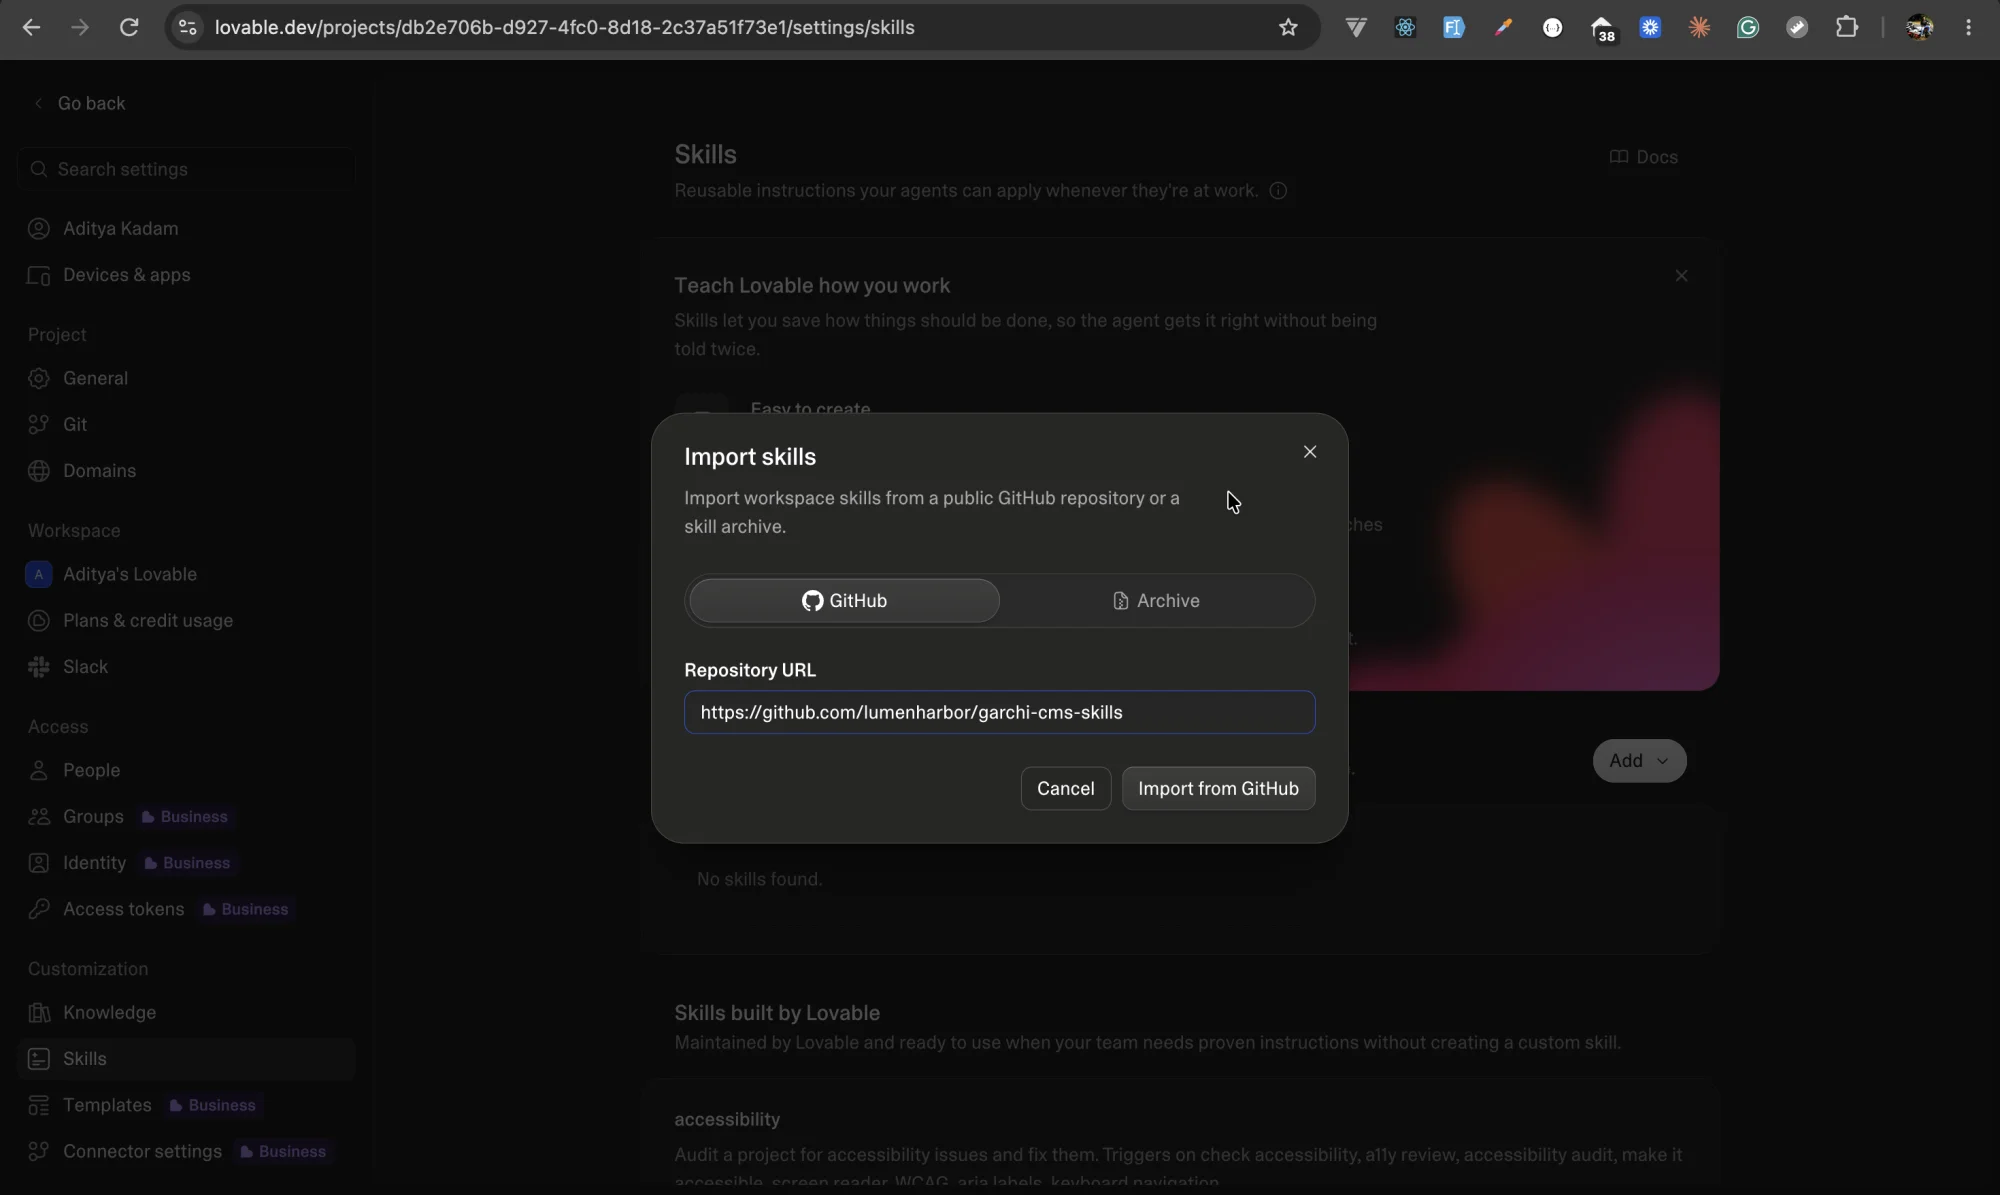
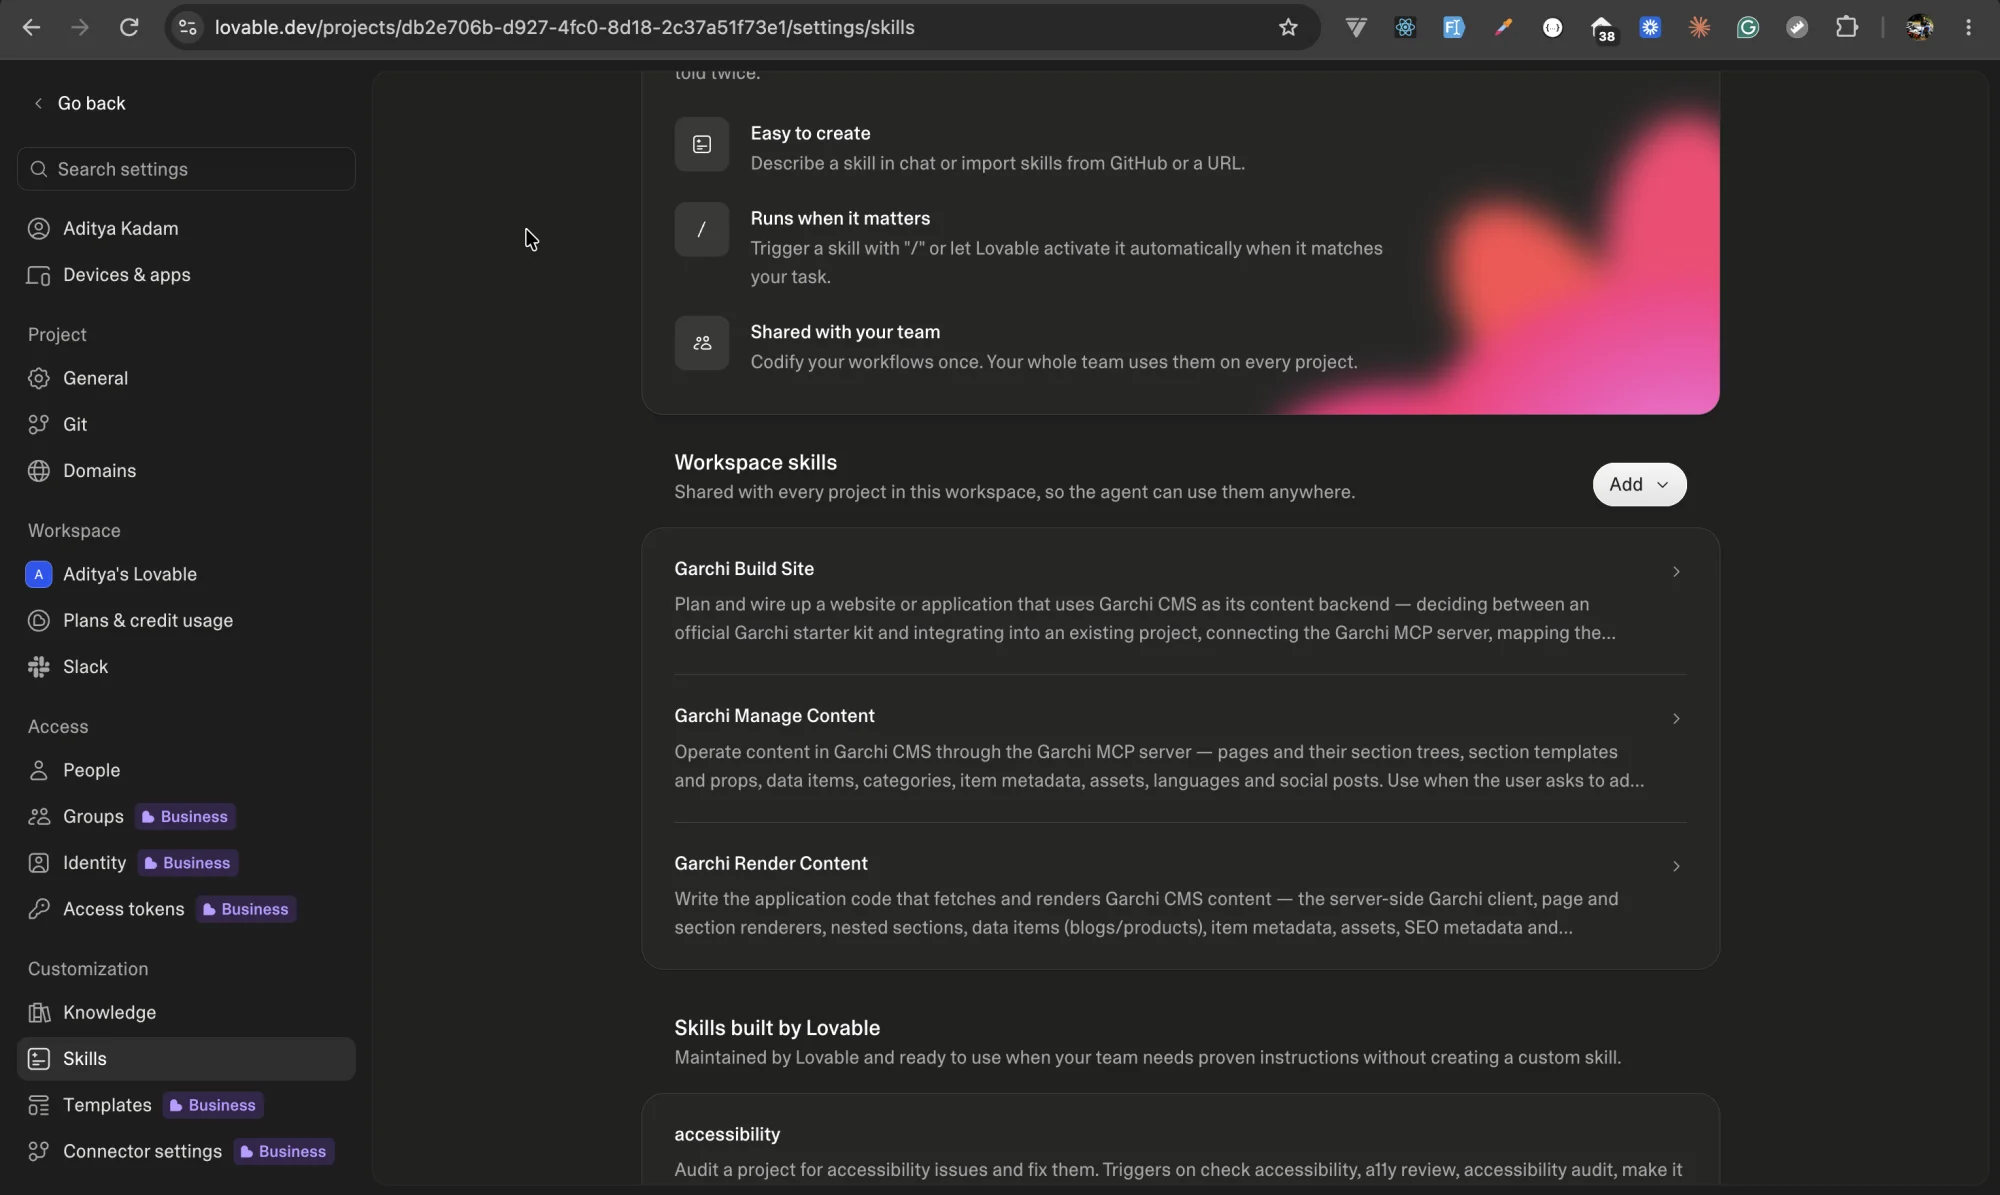
If Lovable still gets the wiring wrong, add Garchi's agent skills to your workspace under Settings → Skills → Add → Import from Github. They give the agent the exact patterns for fetching and rendering Garchi content, so it stops guessing.
Use this GitHub repo link to import skills from GitHub: https://github.com/lumenharbor/garchi-cms-skills
5. Let the agent draft your first post
Using Garchi, draft a blog post announcing [your feature]. Put it in the Blog category and keep it under 600 words.
Lovable calls Garchi's MCP tools and creates a draft. Check your project files afterwards. Nothing changed.
6. Review and publish
Open the Garchi dashboard, find the draft, edit anything you don't like, and hit publish. Refresh /blog and your post is there.
If you check /blog before publishing, the post won't show up. We designed it that way: Garchi only serves published content, so a draft never reaches your visitors by accident.
What changes after setup
Before, fixing a typo meant prompting Lovable, reading through what it changed, and redeploying.
Now you fix it in the dashboard and publish. For a new post, you write it yourself or ask the agent for a draft and approve it. Your co-founder writes in the dashboard and never opens Lovable.
When you're ready, move your FAQs, testimonials and landing page copy the same way. Ask Lovable to create them in Garchi and render them like the blog.
Your co-founder can write that second post now. Lovable never needs to hear about it.